This is an old revision of the document!
Table of Contents
Working with OMERO
The OMERO server supports multiple front ends to add, download and analyse image data. Currently, there are two o ptions available for OICE users:
- - The web interface accessible through https://romulus.oice.uni-erlangen.de: No configuration is necessary in this case, the only requirement for the user is an existing account in the central user database and an HTML-5 compliant browser.
- - The Java-based OMERO client, available for Windows, Mac OS X and Linux at http://downloads.openmicroscopy.org/omero/5.0.1/ with its main module, OMERO.insight. This client requires the installation of an up-to-date version of Oracle's Java Runtime Environment. Additionally, the client has to be configured on the first run to find the OICE OMERO server. This will be described in the next chapter.
The web interface is most useful for quick access to image data on third-party computers where no client software is installed. However, certain features like mass downloads of single files or easy drag-and-drop operation are not yet available with the web client (or can not be made available due to inherent limitations of HTML and Javascript), so OMERO.insight would be the preferred option where available.
Configuration of the OMERO client software
- Make sure to first install Java before trying to run the OMERO.insight module.
- - Unzip the software package to an arbitrary directory and run the OMERO.insight executable. You will be presented with a window such as the one below:
.. 
- - Click on the white wrench icon to open the server preferences window:
.. 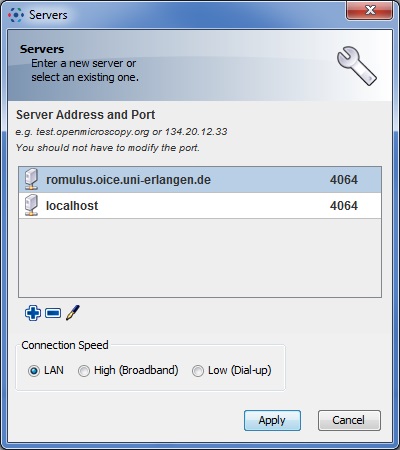
- - Click on the blue plus icon and ad the following server
romulus.oice.uni-erlangen.de. Leave the port (number next to the server) at the default value of4064. - Select the server (by clicking on the name) and click on Apply.
- Next time you open OMERO.insight, the server name left of the white wrench icon should reflect your changes, i.e. state the new server instead of localhost.
- Login with your username and password as usual.
Importing/uploading files to OMERO
There are two ways to upload files to the OMERO server. If you are using one of the OICE's on-site microscopes the preferred way is to use the OMERO DropBox facility. Since the automatic upload has some limitations (files will always appear in the Orphaned Images folder of the last used group), another option is to manually upload your images to the OMERO server. This can be done with the OMERO.insight client, which can both be downloaded separately or called via the OMERO.web interface.
Automatic import via OMERO.DropBox
This is the most comfortable way to upload image files to OMERO. Users at in-house OICE devices (in the future, this will be extended to off-site devices) will be provided with two network shares.
- H:\ which is the home share and has the same name as the user (e.g. mmustermann). Files which are saved here will be accessible on any device but will not be automatically uploaded to OMERO
- X:\ which is the OMERO-DropBox share. If you save any image files on this share, be it on the root level or in any folders or subfolders, those image files will be automatically uploaded to OMERO if the format is recognized (which is the case for over 100 proprietory and open image formats)
Files on the OMERO-DropBox share will not be deleted after upload. Deleting those files is safe and will currently not lead to any action on the OMERO-Server, so your on the server will not be touched once uploaded. The same is true for deleting automatically uploaded files on the server, which will not trigger any action regarding files on your DropBox share. Moving files between folders on the OMERO-Share will not trigger a re-upload, only new files will be uploaded.
As soon as the upload is finished (depending on file size, this should not take longer than 5 minutes), users can find the uploaded images in the “Orphaned Images” folder of the last-used group. There is currently no way to indicate the Project or Dataset that automatically uploaded images should end up in, so you have to move those images using the web interface or OMERO.insight.
OMERO.DropBox is a relatively new feature for the OME-Suite, so problems with the automatic upload can still occur. If you find that this feature is not working for you, you can try the manual upload or you can contact the OICE administrator
Manual import via OMERO.insight
Manual import is currently only supported by the Desktop client OMERO.insight. Support for the web interface is planned and will be realized by the OME developers in the near future. Currently, you have to use OMERO.insight, select your target group (in case you are a member of more than one) by using the provided drop-down list and click on the Importer Icon in the top bar to upload your files. A dialog will pop up which allows you to select files, a target Project and a target Dataset.